

Will these tools make changing the timing belt easy?
http://cgi.ebay.com/...1QQcmdZViewItem
http://cgi.ebay.com/...1QQcmdZViewItem
Or is there any tool thats not standard that people found changing the timing belt easy?
Welcome to 4GTuner
Register now to gain access to all of our features. Once registered and logged in, you will be able to create topics, post replies to existing threads, give reputation to your fellow members, get your own private messenger, post status updates, manage your profile and so much more. If you already have an account, login here - otherwise create an account for free today!
Register now to gain access to all of our features. Once registered and logged in, you will be able to create topics, post replies to existing threads, give reputation to your fellow members, get your own private messenger, post status updates, manage your profile and so much more. If you already have an account, login here - otherwise create an account for free today!

#1

 Posted 25 October 2006 - 09:18 AM
BobWrinkle
-
- Active Members
-

- 1,201 posts
Member
 Back to top
#2
Posted 25 October 2006 - 10:35 AM
89vr4
-

- Active Members
-
- 80 posts
Member
- LocationAdelaide
Both of those tools would make it easier and more precise than trying to do it with home made tools.
Especially if your doing it all with the engine in the bay.
Especially if your doing it all with the engine in the bay.
89 RS powered VR-4

#3
Posted 25 October 2006 - 11:37 AM
Jonson
-

- Active Members
-
- 2,332 posts
Advanced Member
- LocationAdelaide
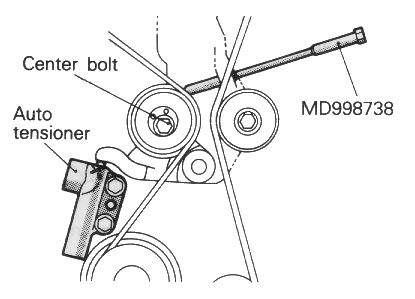
the first one can be very easily made! just a small block with dowels in it and a square cutout for the tension wrench. at work we use this "special tool" with a 3/8" tension wrench. the dowells just sit in the pulley and when using a tension wrench it allows you to get the precise angle needed for the tensioner pulley. Most of the time unless you crack the pulley bolt you never need to adjust it. thats what the hydraulic tensioner if for.
the 2nd one i have no idea what it is. it says to compress the hydraulic tensioner....i just use a vice and slowly wind it in....then use a pin to hold it in place.
the 2nd one i have no idea what it is. it says to compress the hydraulic tensioner....i just use a vice and slowly wind it in....then use a pin to hold it in place.
#4
Posted 25 October 2006 - 12:38 PM
Mr Gears
-

- Active Members
-
- 150 posts
Member
- LocationSeven Hills NSW
the 2nd one i have no idea what it is. it says to compress the hydraulic tensioner....i just use a vice and slowly wind it in....then use a pin to hold it in place.
Timing Belt TSB
Free tip courtesy of Meek Automotive (we just use a length of threaded rod)
#5
Posted 25 October 2006 - 03:49 PM
Evo-00x
-

- Donating Members
-
- 8,151 posts
4G63T AWD CC COUPE
- LocationNewcastle
I'll match your drawing and raise you a page 
UPDATE - Actually here is the whole procedure that you can download in a 400kb PDF: http://www.freefileh...id=rdn8lK/Y9A==
The best part of the process is when you finally can take the pin out of the hydraulic tensioner. I use a small allen key instead of a pin because you have some grip on the 90' bend
AWD. 2 Litre. GTX3076R 0.82.
330kw atw @ 28psi 98 pump fuel.
372kw atw @ 28psi E85 Flexfuel.
EVOLVED AWD COUPE
WWW.EVOCOUPE.NET
330kw atw @ 28psi 98 pump fuel.
372kw atw @ 28psi E85 Flexfuel.
EVOLVED AWD COUPE
WWW.EVOCOUPE.NET
#6
Posted 26 October 2006 - 12:14 AM
rob323
-

- Active Members
-
- 2,517 posts
Don't drive it, RALLY it!
- LocationJoyner, Brisbane.
I have never used the first tool as I don't have a torque wrench small enough and I found a bit of threaded rod the right size and locked two nuts together for the second tool - easy and cheap (just like me  )
)
)
Chrome hater No. 1.
Former owner of the pair of ass kicking boots for purchasers of cheap ebay chinese knock off turbos. -Ass kicking boots now for sale SOLD.
VR4 - the "Old Skool" evo!
Former owner of the pair of ass kicking boots for purchasers of cheap ebay chinese knock off turbos. -
VR4 - the "Old Skool" evo!
#7
Posted 26 October 2006 - 08:09 AM
BobWrinkle
-
- Active Members
-
- 1,201 posts
Member
Woah this should be a sticky thats brilliant info...
On the other hand made me realise this is a job that needs to be lef tto the professionals
On the other hand made me realise this is a job that needs to be lef tto the professionals
Yellow Evo 8 '04 - #47
Selling '89 VR4 RS - Buy it you know you want to!!
Selling '89 VR4 RS - Buy it you know you want to!!
#8
Posted 26 October 2006 - 10:08 AM
Jonson
-
- Active Members
-
- 2,332 posts
Advanced Member
- LocationAdelaide
Yes....timing belts are kind of crucial. unless its a non interference engine like the 4G62 SOHC (Cordia turbo) knock ya self out trying....you wont do damage if you get it wrong.
#9
Posted 26 October 2006 - 02:46 PM
Meek Automotive
-

- Active Members
-
- 52 posts
Advanced Member
Incase anyone was wondering.
The rod and the offset bearing tool apply to the whole series.
4g63vr4 evo 1-9
My method to timming belt fittment.
Hold the two top sprockets in place with 2 17mm spanners
i find once you time the upper sprockets correctly secure the belt with simple paper clips.
they will hold the sprokets tight.
Then pull the belt tight down onto the oil pump sprocket.
then around the crank.
#10
Posted 14 November 2006 - 10:52 PM
rob323
-
- Active Members
-
- 2,517 posts
Don't drive it, RALLY it!
- LocationJoyner, Brisbane.
Maybe its just me, but I have always found that I have had to pretension the exhaust cam by two teeth to get the markings on the cams to line up once you have spun the engine over by hand.
Chrome hater No. 1.
Former owner of the pair of ass kicking boots for purchasers of cheap ebay chinese knock off turbos. -Ass kicking boots now for sale SOLD.
VR4 - the "Old Skool" evo!
Former owner of the pair of ass kicking boots for purchasers of cheap ebay chinese knock off turbos. -
VR4 - the "Old Skool" evo!
#11
Posted 12 January 2007 - 11:26 PM
JonnyRochester
-

- Active Members
-
- 36 posts
Member
- LocationHobart, TAS
I have just posted my problems in Members Rides. I had trouble seeing when the cams were in the vertical position as there are no markings. There are only marking on the cam wheels and not the head. The 2 markings on the cam wheels have to face each other, but this is not good enough to make sure the cams are timed correctly!!!!
Anyone else have trouble with this? How do I time the cams correctly the next time, and be 100% sure of this, without having to use a degree wheel and dial gauge?
Once setup, I should probably make some markings myself so I know next time.
Anyone else have trouble with this? How do I time the cams correctly the next time, and be 100% sure of this, without having to use a degree wheel and dial gauge?
Once setup, I should probably make some markings myself so I know next time.
#12
Posted 11 February 2007 - 06:37 AM
JAP63
-

- Active Members
-
- 2,073 posts
E III Recaro Pilot
- LocationGold Coast
I have just posted my problems in Members Rides. I had trouble seeing when the cams were in the vertical position as there are no markings. There are only marking on the cam wheels and not the head. The 2 markings on the cam wheels have to face each other, but this is not good enough to make sure the cams are timed correctly!!!!
Anyone else have trouble with this? How do I time the cams correctly the next time, and be 100% sure of this, without having to use a degree wheel and dial gauge?
Once setup, I should probably make some markings myself so I know next time.
from what i can gather..if the dowel pins are at 12 Oclock and the cam notches meet each other face to face at 3 oclock and 9 0clock then thats where it supposed to be.
in theory..the notches can only really meet exactly oppsosite and together at one point.
right?
17-08-2007, 01:46 PM
He was right (now back to a F**kn Barina) Lookn for a 7 though !!!!!!!!In no time you'll realise you made a mistake.
You'll be back
#13
Posted 11 February 2007 - 06:38 AM
JAP63
-
- Active Members
-
- 2,073 posts
E III Recaro Pilot
- LocationGold Coast
Maybe its just me, but I have always found that I have had to pretension the exhaust cam by two teeth to get the markings on the cams to line up once you have spun the engine over by hand.
i dont understaned how it could move..the belt is toothed and shouldnt slip...if the belt drives and doesnt move then it should come back to the same spot...
agreed?
17-08-2007, 01:46 PM
He was right (now back to a F**kn Barina) Lookn for a 7 though !!!!!!!!In no time you'll realise you made a mistake.
You'll be back
#14
Posted 11 February 2007 - 09:21 PM
JonnyRochester
-
- Active Members
-
- 36 posts
Member
- LocationHobart, TAS
from what i can gather..if the dowel pins are at 12 Oclock and the cam notches meet each other face to face at 3 oclock and 9 0clock then thats where it supposed to be.
in theory..the notches can only really meet exactly oppsosite and together at one point.
right?
If one cam is at 5min past 12, and the other is at 5min to 12, then the marks on the cams still line up!!!!!! Maybe you would think this was easy to eye ball, but with such big cam gears you can have each cam out one tooth and you would swear it all lined up.
In later model EVOs they fixed this by extending the cam cover high behind the cams gears, and there are timing marks.
But one way we can double check our cam timing on these old engines is to use a straight ruller and hold it horizontal through the centre line of both cams and check the marks.
#15
Posted 11 February 2007 - 09:27 PM
JonnyRochester
-
- Active Members
-
- 36 posts
Member
- LocationHobart, TAS
Maybe its just me, but I have always found that I have had to pretension the exhaust cam by two teeth to get the markings on the cams to line up once you have spun the engine over by hand.
i dont understaned how it could move..the belt is toothed and shouldnt slip...if the belt drives and doesnt move then it should come back to the same spot...
agreed?
When the timing belt is not fitted, one of the cams will not like to sit in its spot. This is because of the valve springs. The cam will spring around to where it wants to be. You can hold the cam in position and put the belt on but it still maybe out because the timing belt will not have it's propper tension yet.
#16
Posted 11 February 2007 - 10:29 PM
rob323
-
- Active Members
-
- 2,517 posts
Don't drive it, RALLY it!
- LocationJoyner, Brisbane.
If you put a 1/8" drill bit into the cam gear that has the mark in the recess between the teeth, you can slide the drill bit over until it touches the head and you can tell exactly then if it is lining up with the top of the head. There are no marks on the head because they are to line up with the top of the head.
The reason why you have to advance the exhaust cam is because thats the side that has the tesioner on it. As the tensioner extends and tightens the belt, it pulls the exhaust cam back anticlockwise.
The reason why you have to advance the exhaust cam is because thats the side that has the tesioner on it. As the tensioner extends and tightens the belt, it pulls the exhaust cam back anticlockwise.
Chrome hater No. 1.
Former owner of the pair of ass kicking boots for purchasers of cheap ebay chinese knock off turbos. -Ass kicking boots now for sale SOLD.
VR4 - the "Old Skool" evo!
Former owner of the pair of ass kicking boots for purchasers of cheap ebay chinese knock off turbos. -
VR4 - the "Old Skool" evo!
#17
Posted 17 March 2008 - 12:30 AM
mattrat
-

- Active Members
-
- 1,590 posts
Advanced Member
- LocationAdelaide
wouldnt one tooth off either way would just be like an adjustable cam gear.
you could either retard or advance it and with only one tooth of it wouldnt do any damage. maybe if its 2 or 3 or 4 teeth off it might pose a problem but 1 shouldnt matter should it?
you could either retard or advance it and with only one tooth of it wouldnt do any damage. maybe if its 2 or 3 or 4 teeth off it might pose a problem but 1 shouldnt matter should it?
#18
Posted 17 March 2008 - 12:40 AM
Sloth
-

- Active Members
-
- 117 posts
Advanced Member
1 tooth (zorst side) = noticable power loss, but no engine damage
(thanks to previous "engine builder" for providing me with this practical example).
It ran like a bag of shit till revs built, but when valve train was checked prior to proper resetting, there was no damage.
Actually, this is the reason I now do most/all the work myself. (I don't have the gear for some of the fabricating stuff.) I find it hard to trust some of the monkeys out there. To the point that I got myself qualified as an "Automotive Mechanical Engineer".
Rule of thumb: check, recheck, and then check it again.
You can never have too much horsepower to drive to work...
#19
Posted 09 November 2014 - 06:16 AM
matts4g
-

- Members
-
- 39 posts
Advanced Member
- LocationMackay
Do you guys replace water pump timiming belt tensioner and associated pulleys at the time of timing belt replacement. Are these parts common for failing?
#20
Posted 12 November 2014 - 06:09 AM
evo-gsr
-

- Active Members
-
- 10,379 posts
Advanced Member
- LocationBuddhist Temple NSW
Its a good idea to do them all at once while you are in there. Saves having to do it down the track.....
[qoute name="BMGTZ" post="331212" timestamp="1467451744"]I don't know anything ...
Trust in the master of taxis.... He will set you straight[/quote]
Trust in the master of taxis.... He will set you straight[/quote]
0 user(s) are reading this topic
0 members, 0 guests, 0 anonymous users

